This recipe couldn’t be easier to remember, I call it the 150 recipe, as it’s the number you have to memorize, regarding quantities. In fact, the measurements of this sponge cake can be used as a basis for any sponge cake you imagine (yogurt, fruit, vanilla, etc.).
Ingredients:
• 150 gr of wheat flour.
• 150 ml of coconut milk.
• 150 gr of melted butter.
• 150 gr of sugar.
• 3 tablespoons dark cocoa powder.
• 3 eggs
• 1 sachet of pastry yeast.
Optional: 5 ml of bitter almond extract.
Steps to follow:
• Mix the sugar with the egg yolk and butter until a homogeneous cream.
• Add the coconut milk, the bitter almond extract and the dark cocoa powder.
• Gradually add the flour mixed with the yeast until you get a creamy butter without lumps.
• Beat the egg whites until stiff.
• Incorporate the egg whites into the butter, little by little, making enveloping movements.
Esta receita non podería ser máis doada de lembrar. Eu chámolle a receita dos 150, xa que é o número que tedes que apuntar para as cantidades. De feito, as medidas deste biscoito pódenvos servir de base para calquera biscoito que imaxinedes: con iogur, froitas, vainilla etc.
Ingredientes:
150 g. de fariña de trigo.
150 ml. de leite de coco.
150 g. de manteiga fundida.
150 g. de azucre.
3 culleradas de cacao en po.
3 ovos.
1 sobre de lévedo de repostaría.
Opcional: 5 ml. de extracto de améndoa amarga.
Pasos a seguir:
Mesturar o azucre coa xema dos ovos e a manteiga até conseguir una crema homoxénea.
Incorporar o leite de coco e o cacao en po.
Agregar, paseniño, a fariña mesturada co lévedo até obter unha masa cremosa e sen grumos.
Bater as claras a punto de neve.
Incorporar as claras á masa, aos poucos, facendo movementos envolventes.
Colocar a masa nun molde de biscoito.
Enfornar durante 25 ou 30 minutos a 170 graos centígrados.
Today I’ll show you how to make a very basic sweet recipe that is super practical to fix breakfasts time or to serve with coffee/tea when you invite people over: Sponge cake with Limoncello cream
Ingredients
Sponge Cake
100 grams of sugar
150 gr wheat flour
150 gr butter
1 sachet of baking yeast
1 shut of limoncello cream
25 g of citrus powder
3 eggs
Steps
• Mix sugar, yolks and melted butter. Whisk until you get a well-blended cream.
• Add the citrus powder and the Limoncello cream.
• Gradually introduce the flour mixed with the yeast.
• Whisk the egg whites until they are stiff.
• Incorporate the egg whites into the dough little by little, and making enveloping movements, so that the egg whites do not lose air.
• Bake for 25 minutes at 170 degrees Celsius.
Icing
50 gr icing sugar.
½ lemon juice.
Steps
• Once the sponge cake is almost cold, mix the icing sugar with the lemon juice and whisk until well dissolved.
• Paint the surface of the sponge cake with the citrus mixture and let it cool on a rack.
Hoxe tráiovos unha receita doce moi básica que resulta moi práctica para solucionar os almorzos ou para poñer co café cando temos visita: biscoito de crema de limoncello.
Ingredientes
Biscoito
100 g. azucre.
150 g. fariña de trigo.
150 g. manteiga.
1 sobre de lévedo de repostaría.
1 chope de crema de limoncello.
25 g. de po de cítricos.
3 ovos.
Pasos
Mesturar o azucre, as xemas e a manteiga derretida. Bater até conseguir unha crema ben amalgamada.
Engadir o po de cítricos e o chope de crema de limoncello.
Introducir aos poucos a fariña mesturada co lévedo.
Bater as claras a punto de neve.
Incorporar as claras á masa facendo movementos envolventes para que non perdan aire.
Enfornar durante 25 minutos a 170 graos centígrados.
Glaseado
50 g. azucre glas.
Zume de medio limón.
Pasos
Unha vez o biscoito estea case frío, mesturar o azucre glas co zume de limón e bater até que quede ben disolto.
Pintar a superficie do biscoito coa mestura cítrica e deixar arrefriar.
Remember the Donuts we made a few weeks ago? So, when you find yourself with more dough than you initially need for the day, it is not necessary to make all the Donuts in one go. Luckily, this type of dough freezes perfectly, being able to leave it in the freezer until you need it again. In this case, I had dough to make half a dozen donuts but I decided not to spend much time and make a king size one, as if it were a cake.
For the icing, instead of spending loads of time melting chocolate, I varnished the surface with chocolate spread (before the doughnut cooled completely). Also, to finish with a touch of citrus, I sprinkled the surface with the homemade orange and lemon powder I taught you how to make yesterday.
And that’s basically it, in less than 30 minutes you have your doughnut ready to serve for a special breakfast, to offer your coffee dates (or keep it all to yourself!).
Bo día! Acordádesvos dos dónuts que fixemos hai unhas semanas? Pois cando a cantidade de masa sexa máis do que precisamos, non é necesario facer todos los dónuts dun chimpo. Por sorte, este tipo de masa conxela perfectamente, polo que podedes deixala no conxelador até que a volvades necesitar. Neste caso, eu tiña sobrantes como para facer media ducia de roscas, mais decidín non gastar moito tempo e facer unha XXL, como se fose un queique.
Para a cobertura, no canto de pasar polo traballo de fundir chocolate, vernicei a superficie con crema de cacao (antes de que arrefriase por completo). Alén diso, para rematar cun toque cítrico, empoei a rosca coa mestura de laranxa e limón caseiro que vos ensinei a facer hai uns días.
Iso é todo! En menos de 30 minutos xa temos resolto un almorzo especial ou o acompañamento para o café se temos visita (e se non, tamén!).
Today I bring you a sweet recipe to give a new life to those fruits going to waste on particularly warm days. One of my culinary obsessions is to find a second use to those products that are about to go to waste: Leftovers, products about to rot or even the orphan foodstuff left alone on your fridge. I always try to follow a zero–waste policy.
On this occasion I decided to share the recipe I use to put into practice when my fruit basket is about to say “GAME OVER”; kiwi & nectarine marmalade. This sweet is a quite versatile product as you can use it for breakfast (on a good old toast) or as a complement for a decadent dessert. The fruit of use is completely random, choose the ones you love. I tend to use acid–ish fruits as I’m not a big fan of too–sweet goodies.
Ingredients
1 kg of fruit.
400 gr of refined sugar.
The juice of ½ lemon.
Instructions
Put the pealed fruit on a bowl and mash it until smooth. If you like it chunkier, be my guest. The world is your oyster!
Once the purée is ready, mix it up with the sugar and let rest for 3 hours in the fridge.
Once the refrigeration period is over, put the mix on a saucepan (medium–low heat) and stir in short intervals, for at least 45 minutes. The cooking time will depend on the thickness you want to obtain.
Note: If you want to control the thickness of the marmalade you can use gelling sugar or agar. Besides, if you have a baking machine and you want to optimize your time, most of these devices have a marmalade program.
Hoxe tráiovos unha receita doce coa que dar uso a esas froitas que se vos están a estragar nestes días de calor abafante. Unha das miñas obsesións na cociña é o buscarlle sempre unha segunda vida a eses produtos que se están a derramar: sobras de días anteriores, produtos a piques de esmorecer ou mesmo eses alimentos que van quedando orfos no frigorífico.
Nesta ocasión decidín partillar convosco o que adoito facer coa froita madura antes de que bote barola; marmelada de kiwi e pexego. Este doce é un produto bastante versátil, xa que vale tanto para almorzar (cunhas boas torradas) ou como complemento para unha boa sobremesa. O tipo de froita a empregar é completamente aleatorio: podedes botar man das que máis vos gusten. Eu acostumo utilizar froitas algo acedas, porque non son moito de lambetadas.
Ingredientes
1 kg. de froita.
400 g. azucre refinado.
Zume de ½ limón.
Instrucións
Botar a froita pelada nun recipiente e pisala até que quede feita puré. Se, pola contra, a vós gústavos máis con tropezóns, adiante!
Unha vez teñamos o puré listo, amalgamarémolo co azucre e darémoslle un repouso de 3 horas no frigorífico.
Pasado este tempo de refrixeración, botaremos a mestura nunha pota e porémola a lume medio/baixo, removendo cada pouco, durante uns 45 minutos. O tempo de cocción dependerá do espesor que lle queirades dar.
Nota: Se queredes controlar o espesor da marmelada podedes empregar azucre xelificante ou un chisco de ágar–ágar. Alén diso, se tedes unha panificadora e queredes otimizar o voso tempo, a maioría destes aparatos traen xa un programa para marmeladas.
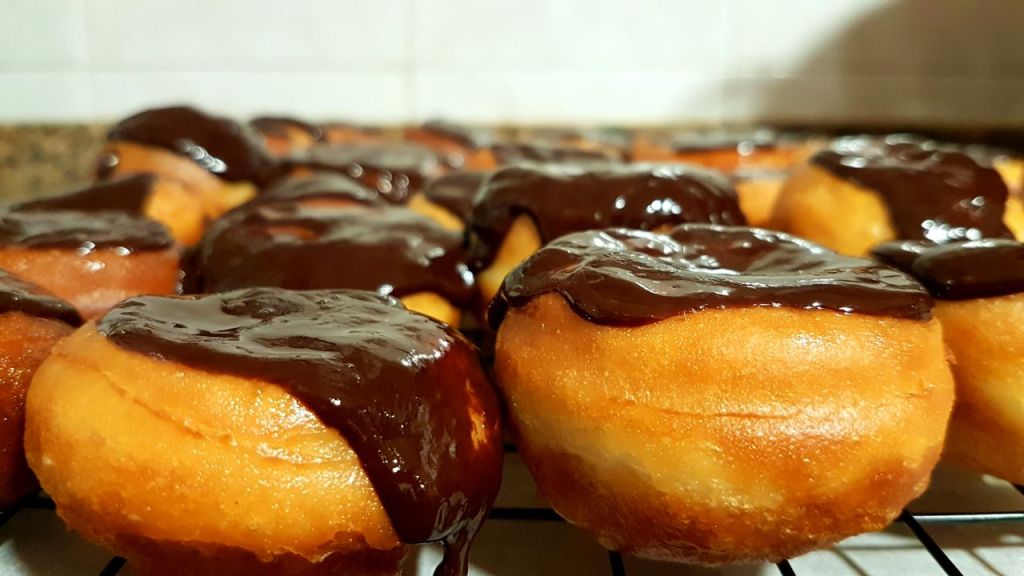
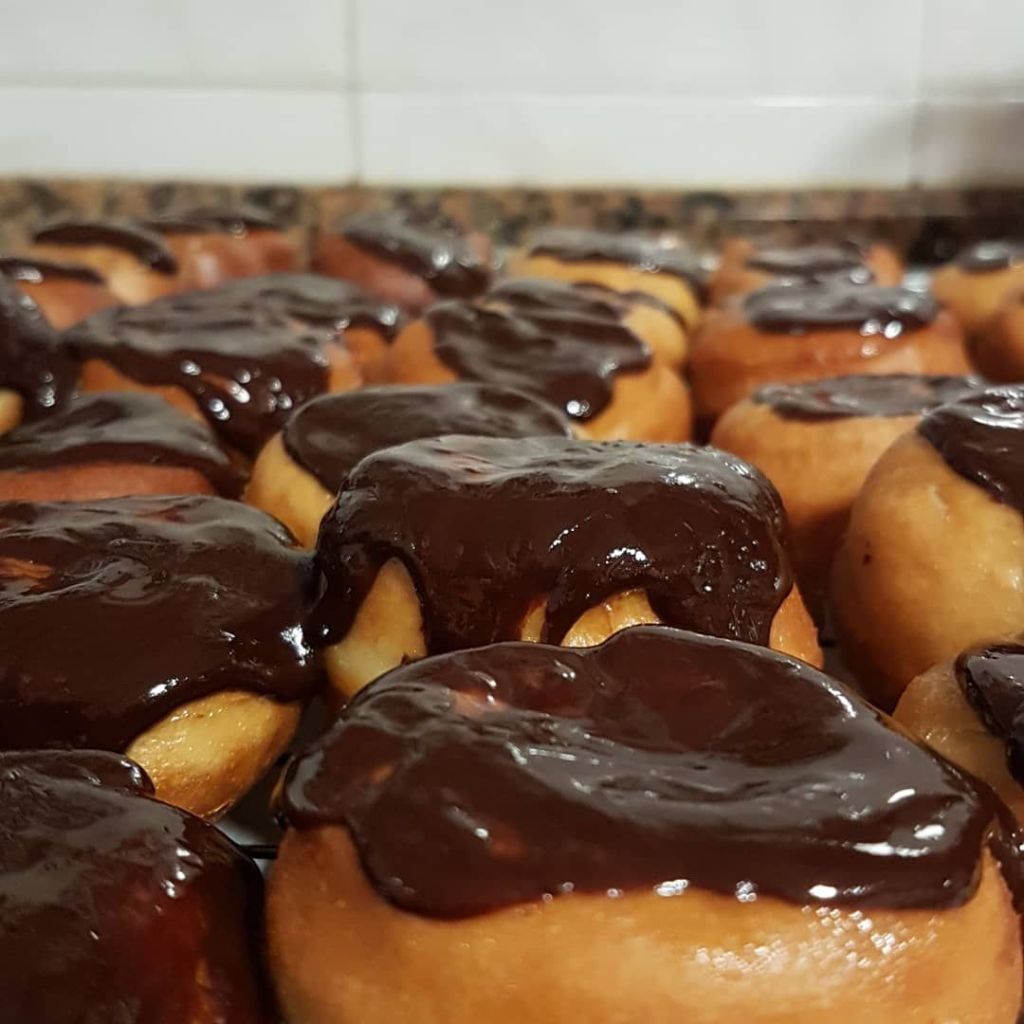
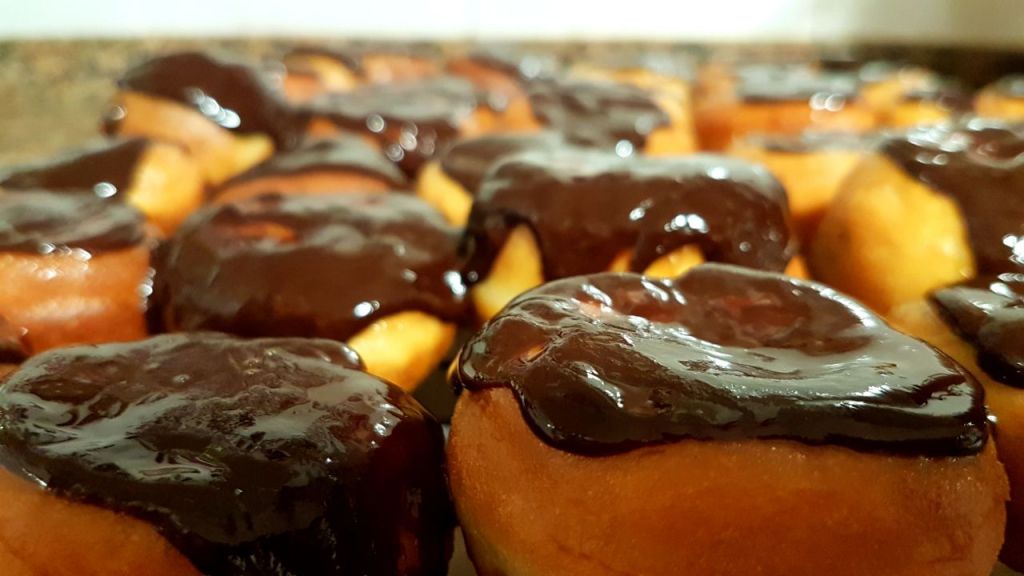
The origins of Doughnuts, incredible as it may seem, are very ancient. According to Smithsonian Magazine, the doughnuts we know (and devour) come from olykoeks, from the Dutch cuisine. These balls of oil that Dutch settlers brought to Manhattan, back in 1624, were modified over the years to become the glazed and multiflavored doughnuts that we know today.
As for the original olykoeks creators, it is not very clear who was the real deal. On the one hand, there are those who claim that it was the Sephardic Jews of Portugal who, in the 15th century, introduced this typical Hanukkah sweet to the Netherlands. On the other hand, various voices indicate that it was the Germanic tribes that gave life to the olykoeks to be tasted at the Yule celebrations, during the winter solstice. Anyway, whoever the real creator of this marvel is, what is crystal clear is that the presence of doughnuts, in most recipe books all around the world, comes from afar.
Dough ingredients:
500 gr strong flour
80 g sugar
250 ml of full fat milk
15 gr fresh yeast
1 pinch of salt
1 beaten egg
50 gr butter
5 ml vanilla extract or the seeds from a fresh pod
Icing ingredients:
50 gr melting chocolate
20 gr of butter
120 gr icing sugar
First of all, it is necessary to prepare a pre-fermentation. A kind of quick sourdough, so to speak, which helps the process of leavening the dough.
Steps to make the Pre-fermentation:
– Dissolve the fresh yeast in a stream of milk at room temperature.
– Incorporate 3 tablespoons of flour in the mixture of milk and yeast, until it has a dough texture.
Let stand 15 minutes
Steps to make dough:
– Mix the flour, sugar and salt in a large bowl that allows you to work the dough, if you are kneading by hand. If you are going to use a robot, throw the ingredients directly into the kneading bowl.
– Add the milk, little by little, to the dough.
– If you work with a robot, this will be the time to put the kneading hook (always medium speed) and add the beaten egg.
– Add the pre-ferment to the whole mixture and continue kneading.
– Once the dough is well formed and no longer stains the kneading bowl, add the vanilla.
– When the vanilla is already incorporated into the dough, add the butter in two stages: first one half and, when there is no trace of it, the other half.
– When the dough no longer sticks or stains, it is ready to rest.
Let stand 90 minutes
Steps to form the doughnuts:
– Roll out the dough with a rolling pin [thickness 1.5 cm approx.]
– Shape the doughnuts with a round mold or, if you don’t have a mold, use any round container or pasta cutter you have at home.
– To make the inner holes, if you do not have mold, we can use the nozzle of a narrow bottle.
Let stand 45 minutes
Steps for frying the doughnuts:
– Put plenty of oil in a saucepan over medium / high heat.
– Leave each donut for approximately 1 to 2 minutes on each side (always depending on the power of the stove).
Steps to make the icing:
– Melt the chocolate with the butter in a double boiler.
– As soon as the chocolate is ready, add the sugar and mix well until fully incorporated.
NOTE: It is important not to let the doughnuts completely cool before icing them. Once we remove them from the heat, it would be best to let them drain a little on a cooling rack and then dip them into the icing. Once this step is done, leave the doughnuts on the cooling rack again so that the icing hardens.